Researching Model Subjects
by Ora Lassila / So Many Aircraft
When you build a scale model you may want that model to be a realistic portrayal of its real-world subject; in other words, you may want the model to be an accurate representation of history or, shall we say, "objective reality". This may of course not be your aim, in which case you can stop reading now. If you do, however, want to achieve a realistic end result with your model, finding some reference material is a good idea, particularly when you discover that kit manufacturers do not know everything and that kits are not always fully accurate, or when you simply want to build a model of something else than what a kit directly gives you (e.g., an airplane in different markings).
Evaluating Reference Material
Generally speaking, reference material for your project comes in the form of photographs (taken by you or someone else), illustrations (scale plans, cutaway drawings, color profiles, etc.), and stories (because, it turns out, these can contain valuable information about details not revealed in photos or illustrations). Sources for this reference material are principally books and magazines; you may also be able to find material on the Internet, but generally speaking this is not as good a source as printed media. Your mileage may vary, of course, but I have found the following to be true:
- There are a lot of people on the Internet who really do not know what they are talking about. Be careful.
- Lately, people have started "colorizing" old black-and-white photographs; please understand that such images represent someone’s opinion and interpretation of what the original colors might have been. This is also true when some artificial intelligence software tool does the colorizing. See #1 above.
- It is not easy to find usable scale plans on the Internet. Yes, you can find some plans, but quality varies greatly, and most of the time you do not know the original source (which would be helpful in assessing the quality and reliability). What I have seen, sites that distribute plans - including social media groups - often tend to be quite cavalier about copyrights (this is unfortunate, if you care about artists' and researchers' rights, like I do).
- Photographs found on the Internet seldom have the "metadata" you may need: where was the picture taken, when was it taken, what exactly is the identity of the aircraft, these are just some of the questions often left unanswered (I have written about this in the past). Also, my observation about copyrights in #3 also applies here.
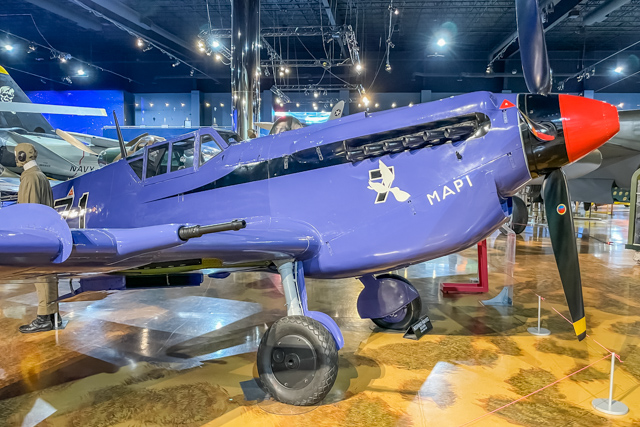
Note that not only colorized photographs, but also published color profiles, models other people have built, and even restored aircraft in museums are just someone’s opinion, and may not correspond to any kind of "historical truth" (again, see #1 above). Museums are really great when you want to find out, say, wheel well details of a particular type of aircraft, less so if you are interested in colors and markings. Having said this, there are some museums whose restoration staff I tend to trust (e.g., the National Air and Space Museum; see my article on RLM colors 81/82/83). In other cases, I do more research: See below pictures of my model of a Hispano HA-1112 Buchón and a restored aircraft at the air museum in Kalamazoo, MI. The discrepancy in the blue color is not a photographic anomaly, the museum piece really is exactly that color, but my research suggested this was not the authentic, original color.
Sometimes you need to research the kits themselves. For example, you come across what you think is a new kit of some interesting subject, but in reality it may be a "re-boxing" of some awful old kit. For this, I find Scalemates to be an invaluable source of "kit genealogy".

Using Scale Plans
Good scale plans (sometimes called "three-view drawings" or "general arrangement drawings") can be used to assess the accuracy of model kit. To do this, you need scale plans in the exact scale of your model, and this may require you to scale whatever plans you have; see our article on scaling and math. Once you have determined the percentage for enlargement or reduction, you can use a photocopier to achieve the scale change, or you can scan the plans and then print them (this is where that little percentage field in the print dialog comes handy).
The easiest way to compare against scale plans is if you can simply lay the part you are studying over the plans; this works well for airplane fuselage halves, wings, etc. For other measurements (e.g., fuselage width) you will also need calipers to help you measure the kit parts and compare these measurements to the scale plans. You should keep plans around throughout the build process so that you can keep measuring and comparing as your project progresses.

Comparing Hasegawa's P-47 wing against scale plans. Laying a part over scale plans sometimes reveals gross discrepancies, but to interpret that as an inaccuracy of the kit you have to trust the plans. For this reason I try to use more than one set of plans.
Taking Photographs of Model Subjects
This can be an extremely handy method of getting information about the details you need to complete your model. Sometimes you can find articles (or Web pages) where somebody has already done a "walk-around", these are very useful. Btu if you have any opportunities to take pictures yourself, do it. Particularly focus on details that otherwise are not well covered, such as landing gear wells and struts, cockpit interior, anything otherwise obscured in "general" photographs (e.g., underside details), and of course markings, particularly if you intend to produce your own decals. In the last case, try to take the photos so that your line of sight is perpendicular to the surface you are interested in, this will help you when you later use the photo to produce artwork (say, via tracing). Also note that you do not necessarily need a fancy, expensive camera for this.
I tend to take "airplane pictures" whenever an opportunity presents itself, even if I do not have a relevant model project underway at the time. These pictures accumulate, and many will be useful for future projects. One never knows. Note that I take pictures of non-aviation subjects as well, as I have been known to occasionally build a tank or some other land vehicle.
Regarding all the pictures I took of the Spanish Buchón in Michigan (see above), they were quite useful, just not so much for colors (or markings). They did reveal a lot of interesting details which came in handy during the model build process.
Collecting and Managing Research Material
Please note that this is not meant to be any kind of an introduction to library science, but rather helpful advice on maintaining your referenvce material library.
Over the years I have collected a modest library of books and magazines, and this library keeps serving me well when I undertake model projects. I have also compiled a catalog of the publications I have, and this makes it easier for me to find the material I need when I start a project. There are many ways to catalog your books and magazines, minimally you should keep a list of what you have (this also helps you avoid purchasing the same book twice).
I started cataloging my reference material when I was a teenager, and at the time it was in the form of note cards in a box; each card was specific to a particular subject (e.g., "Messerschmitt Bf 109") and as I acquired more material I would always go through them and make additions to the cards, and obviously adding cards as needed. At some point I transferred the card catalog to my computer, and have now gone through several designs and implementations of software systems for cataloging. Over the years I have added the capability to also catalog my "kit stash", all the aftermarket parts I have, and also all the photographs I have taken. I do not necessarily recommend doing what I have done, as I became quite obsessed with understanding how to catalog things and how to build digital representations that would let me easo;y discover all the relevant material and resources needed for any particular model project. I would like to tell you that all this culminated in my Ph.D work (I graduated in 2007), but unfortunately the obsession is very real and the work still continues...
However you choose to catalog your library, there are a couple of things to keep in mind:
- Whether you do it on hand-written note cards, or on your computer, the "subjects" (types of aircraft or tanks or whatever you are interested in) should be organized as what is usually called a "controlled vocabulary": Always use the same keyword for referring to a specific subject (i.e., don't say "Mustang" sometimes and "P-51" at other times, pick one and be consistent).
- You do not have to know all the subjects or keywords up front, instead keep adding them as needed.
- Cataloging a library, if you have lots of books, may seem like a daunting task. It is. You will not get through it in one sitting. Therefore, keep track of what parts of your library you have already completed, and what is still to do. This way you can work on it whenever you have time. And make sure whenever you buy a new book, add it to your list, so that later you can go through it and add to your subject catalog.
Whenever I start a model project I first do research, and typically this means picking out the books, magazines, photographs, etc., that I will need. I take notes throughout a project, and at the end type up these notes into a neat project write-up (and I include the list of reference material I used). Examples of these write-ups can be found here.

Screenshot of the author's cataloging software. This is a result of obsessive-compulsive approach to cataloging. Professional driver, closed course. Do not try at home.